Oils well that fairs well?

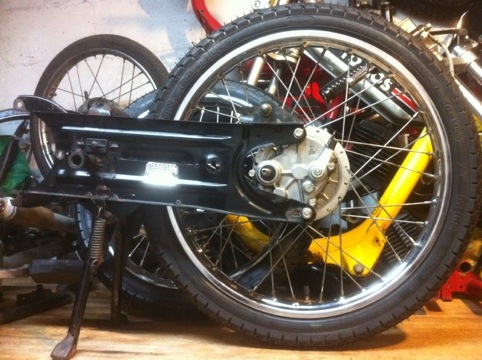
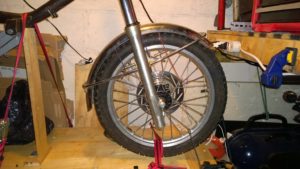
The TSM-SP now has its tools in place and the convertible pannier mounted.  Then I realized I didn’t think of a spot to keep oil.  In my lovely bag, no way.  Jacket pocket, sounds like a recipe for a ruined shirt.  There has to be a free spot on the bike.  Under the seat is the answer!

There is a hollow just big enough to house 2 vials of oil.  Leah and I are (were) Flaviar members and I’ve been saving the little booze tasting bottles.  Now I just needed to make something to hold the bottles in place.

img_2424

I still had a ton of marine vinyl and some dog leash left so back to the sewing machine!

I ended up making a tiny pouch that straps around the frame and leaves the vials suspended as a bit of a shock absorption system.  I made one for each TSM and they fit perfectly, even with the different seat mounts.

img_2490

Just when I thought I was finished with the TSM-SP, Benji and the guys from Treats find tiny fairings.  I need one!  Bonus they were having a sale!  Yay!

In a couple days I had the magical fairing in hand…well in Leah’s hand for these shots.


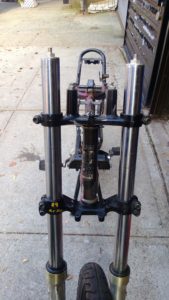
I made a quick mount for it out of some 22 gauge steel and poof!

https://www.instagram.com/p/BNDzci0DM6_

It is only attached to the spot where the plastic rivets connected the windshield to the headlight surround.   After sleeping on it for a while I painted the brace black and added a camera mount.  I also added velcro ties that attach to the triple-tree.

Now it looks like this…

https://www.instagram.com/p/BTWi6IJBuuC

So for now I’m calling this project done.  Is there something else in the works for the TSM-SP…of course there is!  I need to get out and ride this thing more.  To give you some perspective I started the process in October of 2015.  It was tuned and rideable June of 2016.  Finishing touches April 2017.

Ok, Gotta get out riding and shoot some fun rides…and don’t worry…I’ll still be wrenching.

A triple-tree grows in Brooklyn

I repainted the last of the seat plastics and recovered the seat.  Then put things together.

https://www.instagram.com/p/BXEIKmYFE-F/

The long seat trim pieces were a little long and needed to be trimmed down but overall with the rear fender on this build was coming together.

IMG_2251

The big issue was that my triple-tree stem was too short.  I had a long bolt holding things together but I needed something permanent.

To solve this I found a piece of steel tube that fit perfectly into the stem.  I then cut the stem in half and slid the tube in between the halves.  I then adjusted the length so it was about two and a half inches longer and drilled some holes between the old stem halves and the tube.  I then riveted everything together.  Finally I welded everything in place.  There will have to be a catastrophic failure to sheer the rivets and the weld.  Once on the bike everything looked perfect.

https://www.instagram.com/p/BXGPB-Ilukl

I put things back together and then mocked up where the taillight was going to go.  I ended up going with the higher mount.

KAEN7323

The only things to figure out now is how to mount a backwards freewheel.  I won’t put an engine on this guy until the pedals are working…one alignment problem at a time.

Next up…panniers days…it rhymes if you’re French, I swear!

Dual sport goes dual variated

With the tank, headlight, seat plastics and frame painted, it was time to put TSM#2 together.  This is when I remember that I have a dual-variated swingarm hidden in my parts pile.  Why make another TSM when I can build a TSMR or in this case a TSM-DR!

The swingarm needed a thorough cleaning, a little grinding and welding and a couple coats of paint.  After that it was time to put it together

https://www.instagram.com/p/BXehqxoFD5e/?utm_source=ig_web_copy_link

I wanted to use a Puch Magnum pedal crank so it would pedal more like a BMX bike but that didn’t fit right.  (Keep an eye out for an upcoming post as I’m working on a custom crank for both TSMs.)  Spacing things correctly is the next challenge and I’m sure before I’m done I will have to take this apart a couple more times to get it right.

I mocked up some fender mounts on the CR80 forks, made a temporary adapter to mount the forks, and bolted everything up.


You might notice that the back of the seat is missing.  Well I dropped it before the paint cured and knocked a chunk out of it…so time to repaint it…grrrr.


Next up…tree lengthening, marine vinyl, and me.

It was the best of primes, it was the worst of primes.

Back from the DGR ride and inspired by the smell of fall in the air, it was time to start building TSM #2.

A year earlier I had started mocking things up for the build but other obligations got in the way.  This bike would get a CR80 front end and have my favorite Shinko 244 dual-sport tires.

I had laced the DIO RIM to the Peugeot hub using some curved washers…if this was a good idea or not still remains to be seen.

Now a year later I had the tank and plastics painted from my previous painting adventures.  It was time to get this frame in shape.

IMG_0566

Cutting off the excess mounting points, moving some and filling in any dings in the frame and it was time to primer.

https://www.instagram.com/p/BSKMBT9hTQ8/

I was really liking the primer color so I decided to just sand it smooth and clear coat it.

https://www.instagram.com/p/BLCJrCGDEUz/

I also had time to repaint the seat pan and cut some high density foam for a seat.

https://www.instagram.com/p/BSciMlQB98M/

A little clean up on the triplet-trees and everything was looking good.

https://www.instagram.com/p/BLXiPxUj7Gy/

Next up…one is fun but two, Woohoo!

Bolted-up and beautiful but broken?!

Everything is together and looks great but no matter what I do I can get this carb jetted correctly.

https://www.instagram.com/p/BGDmv2ZmnYm

After getting a mediocre idle I discover that my engine has a bad seal.  Not a big deal and while replacing the seal I discover the crank is out of true.  The wobbly crank is what shortened the life of the seal.  I thankfully have another crank and new bearings on hand.  Thanks to Chris from Tomahawk mopeds and Nash for sharing ideas around pressing on bearings.  Time to build my own tool.

https://www.instagram.com/p/BGitJ3cGnSq

It works great and now it is building time!

https://www.instagram.com/p/BGnJdaTGneN

With the engine back on the bike the idle is better but still not great.  No idea what is going on here.

https://www.instagram.com/p/BGozrduGnba

https://www.instagram.com/p/BIaNaVng4xQ

I suspect that maybe there is a leak around the clamp on carburetor.  I try a new shim and that doesn’t work.  I then try using a completely new carb with a spigot mount. It doesn’t really fit and the issue remains.

https://www.instagram.com/p/BJKBgm8gnTs

In a last ditch attempt I break down the carb and rebuild it completely…still impossible to jet.  On a fluke I took the intake off and low and behold it has a hairline crack…insert swearing here…

https://www.instagram.com/p/BJjE8SSgVgg

https://www.instagram.com/p/BJmQVTmhO3W 

If I’m anything I’m tenacious, but try as I might I couldn’t save the old intake.  Ordered a new one from Treatland.tv and I’m finally back in business.  My assumption is that the out of true crank caused excessive vibrations and the strain caused the crack.

https://www.instagram.com/p/BJt-MPHg-wg

After dialing things in its done!   Time to ride!

Next up…weddings and wanderings with wife and wheels.

Holey tanks and holy crap I’m bad at painting!

Once everything was together I decided it was a good idea to clean this old tank before I took it for a ride.  So I filled the tank with Evapo-Rust and left it overnight.

EvapoRust_Bottles1

The next day I checked on the tank and it was mostly empty.  That should have been a sign that something was afoot but I noticed that the gorilla tape and stopper had come loose from the petcock threads so I thought it was just a tape failure.

Flushed out the tank with some acetone and then back on the bike for a ride…I started to pour the premix into the tank and then suddenly it sounded like a mini rain shower!  My tank is officially a spaghetti strainer!

After tossing a paint tray under the bike I managed to stop pouring gasoline on my garage floor.  (Insert swearing here) The tank is definitely free of rust…sadly it’s bottom half was mostly rust but it’s shiny metal now!  After draining the tank for real I coated the inside with a layer of oil and sealed the whole thing up with plastic wrap.

The good news is that I have parts for a second TSM and the tank is already clean…and maybe doesn’t leak?  After a quick test (off of the bike) being leak free is confirmed.  Hop on the bike go around the block and everything is right with the world…well mostly…this tank looks terrible…its got some dents and is spray painted black.

Having never painted anything other than pipes and frames I had no idea how to make a tank look nice.  So I outsourced the work to my buddy Larry…and he managed to find metal under a total of 8 different coats of paint!

IMG_2993What I didn’t realize was, he wouldn’t get any further than that…its weird, he has other things to do other than unpaid work for me…go figure.  Larry did have time to poke around and find the perfect color green!

Bondo is easy…and surprisingly fun once you figure out the timing of mixing and smearing.  I also liked sanding it…little did I know I was soon to be in sanding hell.

I build a tiny paint box and made a lazy-susan with a big bearing and I’m shooting paint.  This is where everything goes down hill.  Too much paint, too fast, too much dust, this isn’t as easy as it looks…what am I doing!!!  After stopping because I’m terrible at painting, I started watching some YouTube tutorials…which told me what I already new…I’m impatient.

After much slowing down and lots of sanding I got the paint right!

Now that I had painting figured out, I decided I should fix the holey tank too.  The only thing better than one TSM is two.

The tank needed the rust removed the rest of the way and low and behold the was a big hole in it to go along with all the little ones.  Patched things up with thisIMG_3013

and then bondo to smooth things out.  A little epoxy to clean up the cracked plastic parts and then paint.  Oh and stripes!

https://www.instagram.com/p/BS2l9ikhmz6

Once both tanks looked good they both got a full can of 2K epoxy coat to make them gas resistant and read to go.

IMG_0448

Note: I intend to Caswell the inside of the striped tank so I can be sure it won’t leak again.  That adventure is TBD.

Next up…back together again but you still won’t be my friend!?

103SP to TSM-SP or Mini TSM or whatever, you get the picture

JFSP4376[1]

Green Machine was my first French moped and the start of my love of silly swinging engines.  From the first time I took a ride on a stock 103SP, I was fascinated with the performance of the “Cadillac” of mopeds.  (Not my term that credit goes to Jerry Murray from his book; Mo-Ped The Wonder Vehicle)

Green was the most exciting thing I had built and even a fast Honda MB5 didn’t change that.  I put thousands of miles on the bike and eventually the fact that I didn’t have a crossbar on it for much of its speedy life finally caught up to me.  The tank started leaking and brazing is not my strong suit…yet.

I decided it was time for the 103SP to evolve.  I loved everything about it except the fuel capacity.  The ride height fit me well and it could handle dubs without issue…so where to go next?

I thought about removing the tank and fitting on a bigger one but then remembered that I had a tank and a frame.  Oh right I have a blog about a moped I’ve never built!

Time to transition Green the 103SP to Green the TSM-SP?  Why a TSM-SP?  Well I’m short and a regular TSM is tall…like me on my tiptoes tall.  My 103SP is lowered and I like to think the SP stands for “Short Person”.  Thus the TSM-SP is born!

Thankfully it’s the shocks, fork and seat that make a TSM tall just like a 103SP…so let the parts harvest commence.

I’m going to use everything from the 103SP except the frame, seat and side covers.  The 103SP’s tank now is empty with a coat of oil in it and it tucked up in the rafters of my garage for when I get around to fixing that leaky tank.

Next up…why Peugeot mopeds are not like Legos.

Subframe Games

My hobbit project is slowly moving forward. I’ve got the Malossi race gears installed, a new wheel built, the engine the way I want it and in the subframe and things are looking good.

Granted I just realized I put the tire on backward. Ugh. So I’ll have to fix that later.

Today I was making some room for the bigger carb.

Hobbits are really well thought out (thank you Mr. Honda) but the stock air-box is not my friend or a PHBG’s friend either. So it’s grinder time!

I wanted to keep the back of the box to minimize tire spray but close up the sub frame as much as possible. This is what I ended up with.

20120620-233033.jpg

20120620-233108.jpg

Looks pretty good and lots of room to wiggle the carb out for jetting.

20120620-233209.jpg
Now put it all together…

20120620-233324.jpg

Next up…Top Tank!

Mopeds for the People

I was just getting good at regularly posting and then life happened. Hopefully you guys/gals/marmots/etc… aren’t counting on something exciting from me all the time.

I have been wrenching like mad though!

First up is my friend Eric’s Peugeot 103. He picked it up a while ago as he road the Green Machine and decided that a variator was in his future. He got a solid frame but the engine was never happy. We tried different coils, checking for air leaks, new points and this moped was a no go.

I had some parts from previous build that I wanted to sell and Eric wanted fast so I built him fast with an emphasis on reliable…now that I’m writing this the moped is going to explode, sorry Eric.

I had an already built 70cc Gila engine that just needed new seals. So new ones were pressed in, added a used Multivar (I <;3 them), a Leo Vince Pipe, a 19 PHBG, and boom.

Everything should work right! Wrong? I was again foiled by an ignition that didn’t want to play…stupid unfriendly ignition!

Enter the Motobecane CDI!

20120614-133206.jpg
This CDI is inexpensive, easy to setup, and makes a great big spark!

Now we have a winner!

20120614-133357.jpg

So that put Eric back on the road and with a little carb tweaking he is a happy camper.

Now my buddy Larry went and sold off all his mopedy-goodness in the process of acquiring some racing motorcycles…the guy has a thing for fast.

Then he had an “I miss my silly mopeds” moment and we got to talking. I had a nice 103 frame that I was planning on making go as stupidly fast as possible, skinny tires and all.

So it became time to make another zippy 103! I started with making the 3rd eye transfer and cleaning up the stock cases.

20120614-134316.jpg

Then it was the usual:
70cc Gila kit
2 Pedal Polini reed block
19 PHBG
Moby CDI and Trail Tech Regulator
Malossi Multivar
Polini Spring and Launch Lever

The twist was a Ninja G3 pipe. These are great all around pipes with a really wide rpm range. Really any pipe works with what is listed above its just a matter of picking a pipe to match your ride style and terrain. My favorite is the Doppler as its got crazy top end and hits really hard but the low end is smooth. The Ninja G3 has better low end but winds out close to the Doppler top. Then if you are doing a ton o city riding the Leo Vince circuit has crazy low end and good kids but keeps you from winding out to far. (that was why it’s on Eric’s build, he rides to work most days).

So after some tweaking of the pipe mounting bracket and the M-bars from my MB5 (I’ll write about that’s eventually too no worries) this is where we were…

20120614-140950.jpg
Add the electrics and tada! Red ripper number 2.

20120614-141115.jpg
I was sorry to see her go but I knew Larry loved it so that was good and anyway I have too many mopeds 😛

Well as fate would have it Red came back. Larry had other projects he needed to fund (like a crazy general build that maybe I can sneak a few pika of) after getting the silly moped bug back in his blood so I bought Red back.

Now I know what you’re thinking, “you just said a few sentences ago that you had too many mopeds!?”. And you would be totally correct. So I sold the very TSM I was going to build for this blog…no yelling, let me explain!

I still love TSMs but my legs are short and sitting on a TSM makes me stand on my tip toes in a most undignified way. So I sold it to my friend Lindsay who is having me build it for her. See, I will be blogging about it and building it but it won’t be mine. I should of named this blog Lindsay’s TSM. If only I had a crystal ball.

Well that is all for now and I’ll be posting Red’s rebuild in a later post…let’s just say its a big engine and a clutch pulley and more silliness!

Hobbity Goodness

With the Green 103SP running great it’s on to writing about my other winter project, The Hobbit! I haven’t come up with a good name for it yet but I’ll come up with something. I’m sticking with the yellow and black look but Bumblebee seems so overdone these days…hmmm…moving on…

So I got this moped from my buddy Ben and he already had some nice parts on it; Parma Kit and Weekends Pipe. The moped looked stock otherwise but ran great just like a stock hobbit should. Of course I want something I can really blow up so I started cutting!

I’m not a fan of the stock seat, so off it came and I mounted up an old Peugeot seat nice and low. I had a Tomos Streetmate front-end that fit right on, the shocks from Old Blue and found some cheap clip-ons on eBay. I slapped it all together to see how the riding position felt and I like it!

20120314-174658.jpg

20120314-174719.jpg
Insert project delay (wedding, honeymoon, work insanity, etc…)

I then scored a ton of Hobbit booty!

20120314-174956.jpg
I’m pretty sure I can build something from all of this!

I wanted to rebuild the rear wheel as the stock rim was pretty rusty and now narrower than the Tomos front wheel. I found the width I wanted on Treats and disassembled 2 rear wheels to find the best (rust free) spokes I could. With a little polishing and some photos of the old wheels lacing I built this.

20120314-175542.jpg
I don’t have a truing stand but 2 Allen keys and the hobbit subframe work pretty well!

20120314-175755.jpg

All done and tire mounted.

Next up some engine clean up in the living room…only attempt this when your wife is out of town!

20120314-181228.jpg
Bring on the engine tweaks:
1. Malossi 21 intake with Dellorto PHBG 21
2. Boyenson dual reeds
3. Removal of the starter clutch
4. Doppler springs
5. TJT with the lightest weights
6. Replaced all the stupid Phillips screw with Allen screws.

Everything goes together really easily. The hardest part was the clutch springs but the using snap ring pliers trick works great. I need to find the video that explains it but you’ll get the idea.

20120314-184634.jpg

20120314-184654.jpgThen put it all together.

20120314-184851.jpg

20120314-184906.jpg

20120314-184921.jpg
Next up is making this guy a top tank and wiring up the HPI!